Differences in Processing and Applications between Planers and Pressed Planers
In the woodworking industry, planers and pressed planers are two core pieces of equipment that appear to have similar functions but actually have distinct roles. Whether in a furniture workshop, a building materials processing factory, or a hobbyist’s studio, accurately distinguishing their process characteristics and application scenarios is key to improving processing efficiency and ensuring the quality of the finished product. This article will begin with a basic definition, delve into the process differences, and provide selection recommendations based on practical scenarios to help both practitioners and enthusiasts effectively utilize these two “wood shaping tools.”
I. Basic Understanding: The Core Positioning of Planers and Pressed Planers
To understand the differences between the two, we must first clarify their core functional positioning. Although both are wood surface processing equipment, they serve different stages of wood shaping and address distinct processing needs.
(I) Planers: The “Surface Builder” of Wood
The core function of a planer is to transform irregular wood surfaces into flat, smooth surfaces while also correcting the verticality of the wood’s sides (i.e., “straightening”). The processing principle is that a planer shaft fixed to the machine bed rotates at high speed, cutting the surface of the wood placed on the work surface. The planer’s work surface consists of a fixed and an adjustable table. The height difference between the two is adjusted to control the cutting thickness. The amount of cutting per pass is typically between 0.1-2mm.
In the wood processing process, planing often serves as the “first shaping step.” Untreated logs or boards often exhibit warping, bending, and uneven surfaces. Planing is necessary to create a flat “reference surface” to provide a reference standard for subsequent processing.
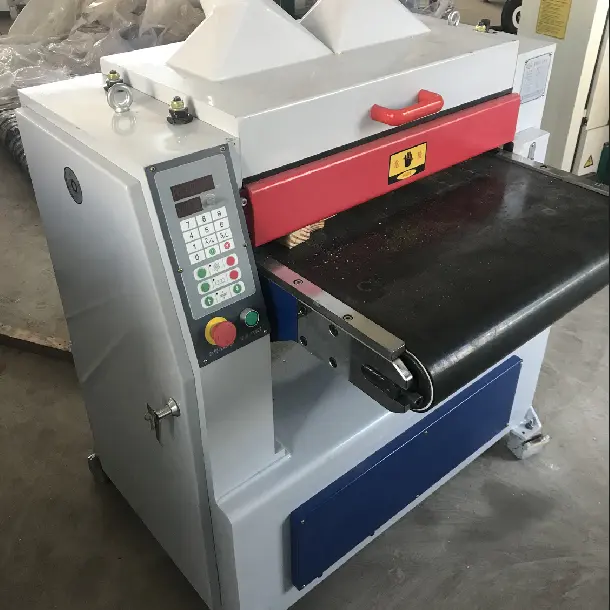
(II) Pressing Planer: The “Thickness Sizing Expert” for Wood
The core function of a presser is to precisely cut the wood to a uniform thickness using the existing flat surface as a reference, ensuring a uniform thickness in the finished product. The processing principle is that two sets of upper and lower pressure rollers compress the wood and feed it to the planer shaft, which cuts the wood from the top (or bottom, depending on the machine model). The wood is fed automatically by the pressure rollers during processing, eliminating the need for manual feeding.
The key advantage of the pressure planer lies in “thickness consistency,” which relies on the reference surface after the planing process. Only when the bottom surface of the wood is flat can the pressure rollers ensure stable feeding of the wood, thereby achieving a uniform thickness on the top surface. Therefore, the pressure planer is usually the “second step” in the wood shaping process.
II. Core Process Differences: A Comprehensive Comparison from Principle to Operation
The differences between the flat and pressure planers extend across multiple dimensions, including processing principles, operating logic, and precision control. These differences directly determine the applicable boundaries of each.
(I) Processing Datum and Core Objective Differences
The core of planing is “creating a datum”: When faced with wood that has an uneven surface, the planer manually adjusts the contact angle between the wood and the planer blade, first machining one surface into a flat datum. This surface is then used as a support for machining the adjacent side surfaces (ensuring perpendicularity). The goal is to resolve uneven and non-perpendicular wood, laying the foundation for subsequent machining.
The core of press planing is “sizing based on a datum”: It must use an existing flat surface (usually the bottom surface after planing) as support, using press rollers to determine the height of the wood and perform a measured cut on the top surface. Its goal is to produce a finished product with a uniform thickness, without correcting the wood’s flatness or perpendicularity.
(II) Cutting Method and Feed Logic Differences
Planing utilizes a “manual push + fixed cutting” method: During machining, the operator holds the wood, places the surface to be machined against the work surface, and pushes the wood across the planer shaft at a constant speed to complete the cut. The feed speed is completely manually controlled, requiring a high level of operator experience. Pushing too fast can easily result in uneven cuts, while pushing too slowly can cause localized overcuts.
Planers utilize an “automatic feed + precision cutting” model: after the wood is placed in the feed port, it is clamped by upper and lower rollers and fed to the planer shaft at a fixed speed. The feed speed is typically adjustable through the equipment (typically 3-15 m/min). This automated feed method not only reduces manual effort but also ensures a stable cutting process, making it particularly suitable for batch processing.
(III) Different Precision Control Dimensions and Error Impact
Precision control for planing focuses on “flatness” and “perpendicularity”: accuracy is maintained by adjusting the levelness of the worktable, the parallelism of the planer shaft and the tabletop, and the operator’s stability during pushing. Any error in the reference surface during planing will have a ripple effect on all subsequent processing steps (including planing). Planer precision control focuses on thickness tolerance: the thickness of the cut is controlled primarily by adjusting the distance between the planer shaft and the reference table (or lower pressure roller), typically achieving an accuracy of ±0.05mm. This error primarily stems from the flatness of the reference surface. If the base surface is uneven, even with precise planer parameters, the processed wood may still exhibit a uniform thickness but uneven surface.
(IV) Applicable Wood Conditions and Processing Ranges
Planers are suitable for “raw or rough-cut wood”: they can process warped, curved wood, wood with burrs or uneven surfaces. The processing range includes flat and side panels, as well as straightening squares. They are particularly adept at processing irregularly shaped wood. However, planers have a limited single-pass processing width (common models have a processing width of 200-600mm) and cannot directly produce boards of uniform thickness.
Planers are suitable for “wood with a pre-existing reference surface”: they can only process thickness on wood with a flat base surface and cannot process warped or curved wood (forcing the process will result in uneven cutting thickness). It has a wider processing width and thickness range (common processing widths range from 200-800mm and thicknesses from 10-200mm), making it suitable for batch processing of standard-sized boards or square materials.
III. In-Depth Analysis of Application Scenarios: A Practical Guide to Customized Selection
Depending on their process characteristics, planers and press planers play irreplaceable roles in different processing scenarios. Accurately matching these applications maximizes efficiency and quality.
(I) Core Applications of Planers
Primary Log Processing: The sawn log rough board is processed to create the first flat reference surface, preparing for subsequent press planing or sanding. For example, before processing solid wood legs in a furniture factory, a planer is required to straighten the cut log rough board and create a reference surface.
Renovating Old Wood: For old wood with worn, varnished, or deformed surfaces (such as old flooring or furniture panels), planing can quickly remove surface defects and restore a smooth surface. For example, when repairing an old wooden door, planing is more efficient than sanding to remove aging varnish and deformed areas.
Shaping of Special Shaped Wood: This process involves processing non-standard sized timber, strips, or slightly curved wood, correcting them to a regular rectangular cross-section through multiple turning operations. For example, in handcrafting, naturally seasoned hardwood strips are straightened to ensure a tight fit during subsequent splicing.
Small-Batch Custom Processing: In small workshops or personal studios, the flexibility of planing is particularly advantageous when faced with diverse wood shapes. The processing angle can be adjusted to the specific imperfections of each piece of wood, eliminating the need for a pre-set standard.
(II) Core Applications of Planing
Mass Production of Standard Boards: When furniture and building materials factories need to process large quantities of boards of uniform thickness (such as wardrobe side panels or flooring substrates), planing, after creating a reference surface through planing, allows for continuous, automated processing, ensuring minimal thickness tolerances for each board. High-Precision Thickness Fine-Tuning: When the finished product has strict thickness requirements (such as musical instrument soundboards and precision wood molds), planing can precisely control the wood thickness within the design tolerance by making multiple small cuts (0.1-0.5mm each), achieving a precision far exceeding that of manual processing.
Multi-Layer Composite Processing: For composite materials such as plywood and blockboard, planing is required to correct the surface thickness before veneer or edge banding to ensure a tight fit between the composite layers and avoid bulges or gaps.
Slab Size Standardization: After planing, planed lumber is processed into uniform cross-sectional dimensions (e.g., 20mm x 30mm strips) for use in frames, mortise and tenon joints, and other applications, ensuring dimensional consistency during assembly. (III) Typical Scenarios for the Two Processes
In the complete wood shaping process, planing and planing typically work in a collaborative process, with both processes working in tandem: planing first, then planing. Neither process can be dismantled:
Solid wood furniture production: sawing logs → planing to align the reference surface → planing to set the thickness → sanding → assembly. The two processes work together to ensure the wood is both flat and uniform in thickness, ensuring a smooth and consistent finish for subsequent painting and assembly.
Custom wooden door processing: splicing wood planks into door panels → planing to smooth the surface → planing to achieve uniform thickness → carving or veneering to prevent deformation or loose closure caused by uneven wood thickness.
Handmade wooden tabletops: joining multiple wood pieces → planing to smooth the joints → planing to achieve uniform thickness → sanding to achieve a smooth, seamless, and consistent thickness, enhancing the quality of the finished product.
IV. Purchasing and Usage Misconceptions: Avoiding Common Pitfalls for Beginners
(I) Purchasing Misconceptions Clarified
“A planer can replace a flat planer”: This is the most common misconception. A planer cannot create a reference surface. If it is used directly on wood without a flat bottom surface, it will simply “replicate” the unevenness of the bottom surface—overcutting the top surface of raised areas and undercutting the concave areas, ultimately resulting in waste material with a “consistent thickness but uneven surface.”
“The higher the planer power, the better”: The core of a flat planer is precision, not power. For home use or small workshops, a 1.5-2.2kW model is sufficient. High-power models (over 3kW) are more suitable for industrial-grade mass production. Blindly pursuing high power will result in energy waste and reduced operational safety.
“The larger the planer’s processing width, the more practical”: The processing width should match actual needs—personal studios often use models under 300mm, while furniture factories require models over 500mm. Excessively wide models are not only more expensive, but also take up more space and are more difficult to maintain.
(II) Usage Precautions
Smoothing Planer Operation: Safety First, Precision Second: Always use a pusher to push the wood to avoid direct contact with the planer blade. Before processing, inspect the wood for foreign metal objects (such as nails) to prevent damage to the planer blade or spatter. For curved wood, start with the convex side and correct it gradually.
Pressing Planer Operation: Begin with a baseline and proceed step by step. Before processing, always ensure the bottom surface of the wood is flat (pre-treatment with a smoothing planer is recommended). A single cut should not be too thick (no more than 2mm is recommended), especially for hardwoods. Repeated, smaller cuts can reduce cracking and machine load. If ripples appear on the surface after processing, check the planer shaft balance or roller pressure. Daily Maintenance: Key to Extending Equipment Life: Clean wood chips from the planer shaft after each use and regularly check the sharpness of the planer blade (a dull blade will result in rough cuts). Lubricate the machine’s guide rails and roller bearings monthly to ensure smooth operation. Regularly calibrate the levelness of the planer table and the parallelism of the planer shaft to the reference surface for the planer.
V. Summary: Accurately Match Your Needs to Maximize Equipment Value
The planer and the press are like the “right and left arms” of woodworking: the planer lays the foundation, creating a smooth reference with flexibility; the press sets the standard, achieving uniform thickness with precision. There’s no absolute superiority or inferiority between the two, only differences in suitability.
For industrial-scale mass production, the automation and precision of the press are key to efficiency, but this is predicated on the standardization of the planer. For small workshops or artisan woodworking, the flexibility of the planer allows for a wider range of wood defects, while the press provides a key supplement to enhance the precision of the finished product.
Post time: Sep-24-2025